Vegeman


Before
After
In order to successfully perform this kind of activity, you will have to use the "Magnetic Lasso Tool" from the toolbox.
- Using Adobe Photoshop, open the before picture above.
- Create a new canvass by clicking the new button which is located at the menu bar. Then put your desired dimensions.
-
Now, using the "Magnetic Lasso Tool" from the toolbox, select the objects and press Ctrl+C to copy it and paste it on the new canvas.
- Arrange the objects according to their positions. To drag the objects, you will have to use the "Move Tool".
- And you have created a Vegeman.
-
To save your vegeman, click "File" -> "Save As" from the Menu Bar. Put your desired name for the file and click the format you want it to be.

Knight

Before
After
In this activity, you will have to use the "Polygonal Lasso Tool" from the toolbox.
- Using Adobe Photoshop, open the before picture above.
- Create a new canvass by clicking the new button which is located at the menu bar. Then put your desired dimensions.
-
Now, using the "Polygonal Lasso Tool" from the toolbox, select the objects and press Ctrl+C to copy it and paste it on the new canvas.
- Arrange the objects according to their positions. To drag the objects, you will have to use the "Move Tool".
-
You can try it for yourself.
- And you have created a Knight.
-
To save your knight, click "File" -> "Save As" from the Menu Bar. Put your desired name for the file and click the format you want it to be.
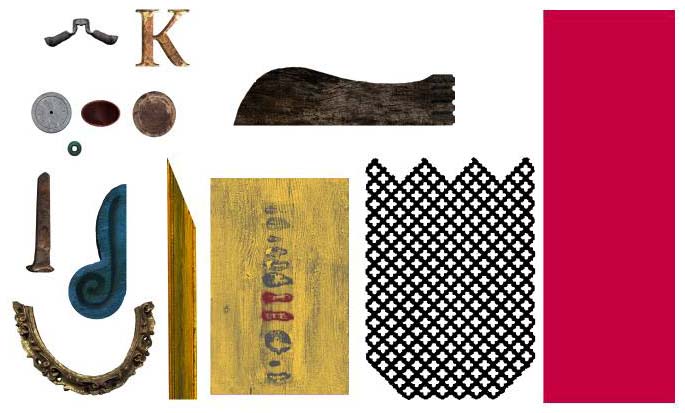
Kitchen World
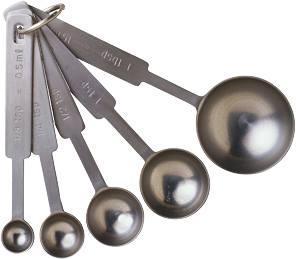
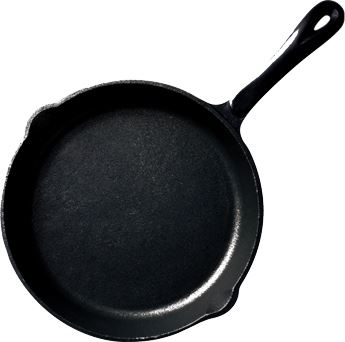
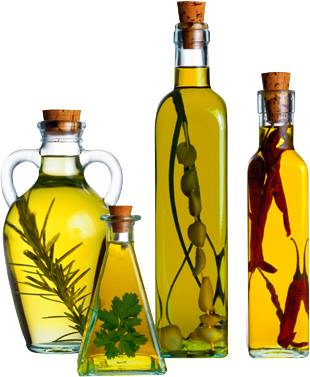
Before

After
In order to successfully perform this kind of activity, you will have to use the "Magic Wand Tool" from the toolbox.
- Using Adobe Photoshop, open the before pictures above.
- Create a new canvass by clicking the new button which is located at the menu bar. Then put your desired dimensions.
-
Now, using the "Magic Wand Tool" from the toolbox, select the objects with the same color that you don't need and press "backspace" from the keypad to delete it.
-
After that, using the "Polygonal Lasso Tool" from the toolbox, select the objects and press Ctrl+C to copy it and paste it on the new canvas.
- Arrange the objects according to their positions. To drag the objects, you will have to use the "Move Tool".
- And with that, you may come up with a new creation, the "Kitchen World".
-
To save your creation, click "File" -> "Save As" from the Menu Bar. Put your desired name for the file and click the format you want it to be.
You Make Me Feel Like A Beauty Queen
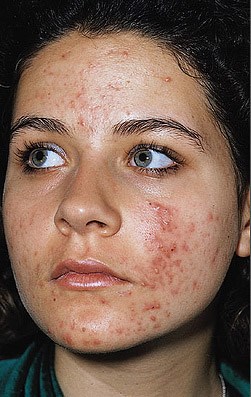

Before
After
In order to successfully perform this kind of activity, you will have to use the "Healing Brush Tool" from the toolbox.
- Using Adobe Photoshop, open the before picture above.
-
Now, using the "Healing Brush Tool" from the toolbox, select clean/nice area on the image(without acne) while pressing the "Alt" button from the keypad. With that, you will use it as a sample.
-
After that, by clicking on the pimples, you will be able to apply the nice part on it, or simply, you are removing the pimples.
- Do this step over and over again and you will get what you want.
-
To make your model look younger and fairer, you may use the "Dodge Tool" to lighten her face.
- And with that, you may come up with a new creation, a Beauty Queen.
-
To save your creation, click "File" -> "Save As" from the Menu Bar. Put your desired name for the file and click the format you want it to be.
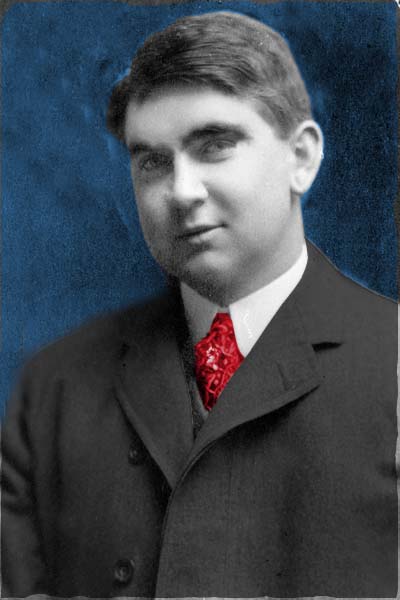
You Make Me Feel Young


Before
After
In order to successfully perform this kind of activity, you will have to use the "Patch Tool" from the toolbox.
- Using Adobe Photoshop, open the before picture above.
-
Now, using the "Patch Tool" from the toolbox, just like using the Polygonal Lasso Tool, select clean/nice area on the image(without wrinkle). With that, you will use it as a sample.
-
After that, drag the selected area on the chosen parts with wrinkle, and you will be able to remove the wrinkles on his face and make him look younger.
- Do this step over and over again and you will get what you want.
-
To make your model look younger and fairer, you may use the "Dodge Tool" to lighten his face.
- And there you have it.
-
To save your creation, click "File" -> "Save As" from the Menu Bar. Put your desired name for the file and click the format you want it to be.
You Make Me Feel New

Before
After
In order to successfully perform this kind of activity, you will have to use the "Clone Stamp Tool" from the toolbox.
- Using Adobe Photoshop, open the before picture above.
-
Let us first focus on removing the old marks.
-
Using the "Clone Stamp Tool" from the toolbox, select clean/nice area on the image(without old marks) while pressing the "Alt" button from the keypad. With that, you will use it as a source.
-
After that, by clicking on the old marks, you will be able to apply the nice part on it.
- Do this step over and over again and you will get what you want.
-
Now, to make the image to look brand new, you will have to use any Lasso Tool. Select the object having the same color then click Image -> Ajustments -> Hue Saturation, from the Menu Bar. Remember to check the "Colorize" Button that you will see. Then, begin on adjusting the color of the object, whatever color you will like to make it look brand new. And click "Ok".
- And with that, you may come up with a new creation.
-
To save your creation, click "File" -> "Save As" from the Menu Bar. Put your desired name for the file and click the format you want it to be.
iRobot


Before

After
In order to successfully perform this kind of activity, you will have to use the "Eraser Tools" from the toolbox.
- Using Adobe Photoshop, open the before picture above.
- Create a new canvass by clicking the new button which is located at the menu bar. Then put your desired dimensions.
-
Now, using any of the Lasso Tools from the toolbox, select the objects and press Ctrl+C to copy it and paste it on the new canvas.
- Arrange the objects according to their positions. To drag the objects, you will have to use the "Move Tool".
-
To have a fading effect, change the apperance of your brush by clicking "right click" on your mouse and select the fading kind of eraser.
- And there you have it.
-
To save your iRobot, click "File" -> "Save As" from the Menu Bar. Put your desired name for the file and click the format you want it to be.
|